
This guide comprehensively explains the steps for selling NFTs on HEXA, how to set collections and tags for the NFTs you create and issue, and even how to launch a community (where you can share information only with people who have bought and hold your NFTs). On HEXA, you can turn a wide variety of data into NFTs, including images, video, audio, 3D data and article content.
Contents
- Applying to sell NFTs
- Setting up your NFT collection page
- Showing related information on the NFT page
- Setting NFT tags
- Launching a Web3-style community
- Promoting NFTs with HEXA LAND ad-space NFTs
- Displaying and selling in a HEXA Metaverse room
- Creating a creator land on HEXA LAND
- Avatar NFTs and area NFTs for HEXA Metaverse
- Generating a page for in-person exhibitions
- Other tips
Applying to sell NFTs
1) Log in with your X (formerly Twitter) account and register on HEXA
First, on the official HEXA website, click the “Sell NFTs” button on the top page or in the header menu.

You will then be asked to authenticate with your X account, so complete X authentication and log in. If you are not logged in to X at this point, you will need to log in to X. If you are on a smartphone, first open X in the web browser you are using for HEXA and log in to X, then authenticate (authentication uses the X account logged in on the web browser you are using for HEXA).

2) Select the type of NFT you want to create and upload your data
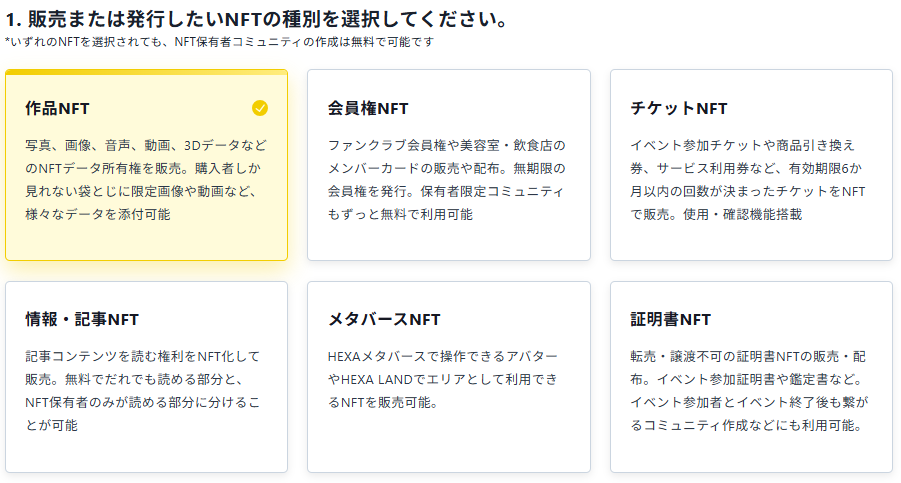
Once X account authentication is complete, select the type of NFT you want to issue.
Artwork NFT: Select this when you want to sell or distribute for free ownership of NFT data such as photos, images, audio, video or 3D data. You can also put data in holder-only content that only buyers can see.
Membership NFT: You can sell or distribute fan club memberships or member cards for hair salons and restaurants. You can issue memberships with no expiration date. Holder-only communities can also be used free of charge indefinitely, making this handy for creating fan clubs and fan communities. It also includes a feature for using the NFT by showing the screen to staff on site. For details on membership NFTs, see here.
Ticket NFT: You can sell or distribute as NFTs tickets with a set number of uses and a validity period of up to 6 months, such as event admission tickets, product vouchers and service vouchers. It includes a feature like a mobile coupon, used by showing the screen to staff on site. For details on ticket NFTs, see here.
Information/article NFT: You can turn the right to read information content or article content, or to read the rest of it, into an NFT and sell it. This is also used for selling information products.
Metaverse NFT: You can sell and issue avatar NFTs and area NFTs that can be used in HEXA Metaverse. For details on avatar NFTs, see here. For details on area NFTs, see here.
Certificate NFT: You can sell or distribute certificate NFTs that cannot be resold or transferred. They are used to issue things such as event participation certificates and appraisal certificates. By creating a community that keeps you connected with event participants even after the event ends, you can retain them and interact with them.
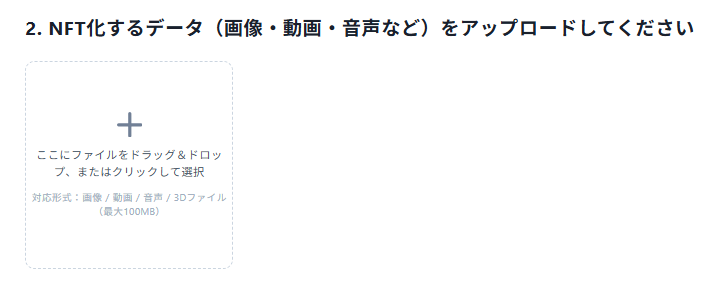
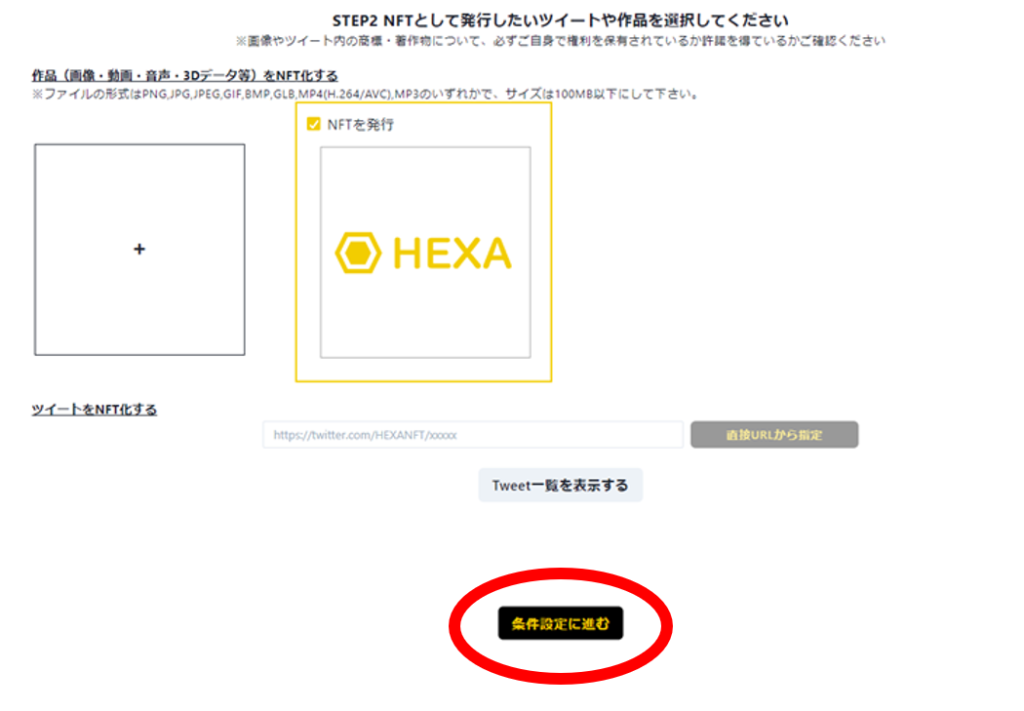
After selecting the NFT type, the next step is registering your data. Press the + button to upload the images, video, audio, 3D data or other files you want to turn into NFTs. If you are issuing multiple NFTs at once, you can also upload multiple files at the same time.
When the upload is finished, click “Proceed to Conditions” to move on. If you have other data you want to turn into NFTs, you can add it by pressing the + button again.
3) Set the sale currency, chain, sale method and sale period
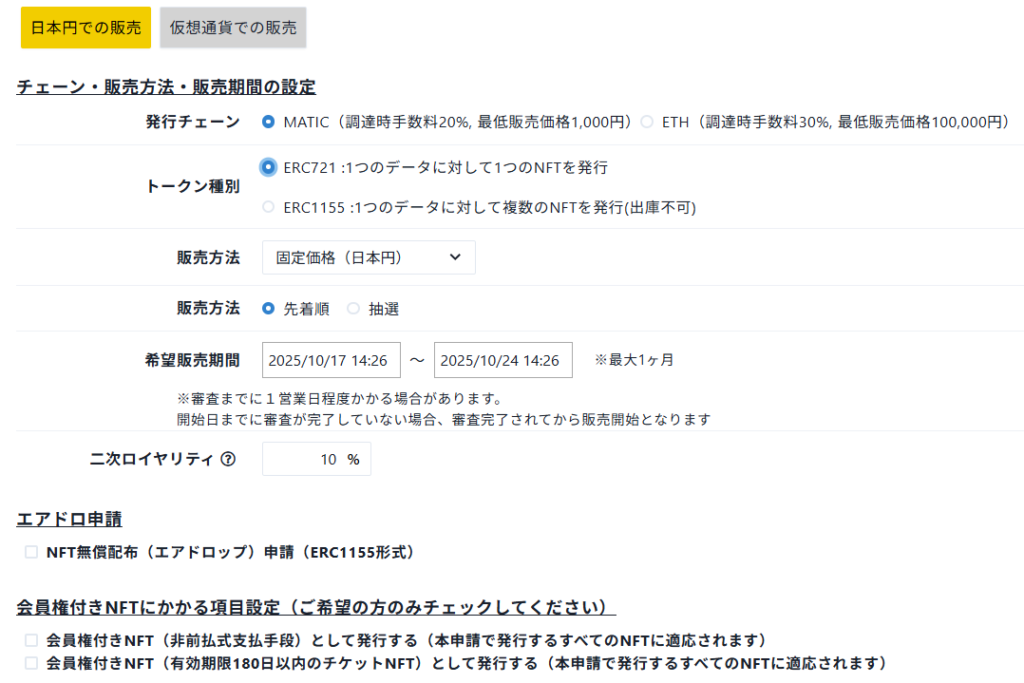
Next, set the currency in which to sell the NFT, the blockchain on which to issue it, and the sale method and period. Here we explain how to sell in Japanese yen (if you want to sell for crypto, you must first register a crypto wallet from My Page → Rewards; for details, see here).
Setting the issuing chain
Selecting MATIC lets you issue NFTs on the Polygon chain. In most cases, we recommend selecting MATIC. You can sell from a minimum price of ¥1,000. Fees are deducted from your sales earnings only once a sale is made, so rest assured you will never incur out-of-pocket costs (if nothing sells, there is no cost at all).
Setting the token type
You can choose between two token types: ERC721 NFT tokens, which issue one NFT per piece of data, and ERC1155 NFT tokens, which can issue multiple NFTs per piece of data. Note that for ERC1155 NFTs, due to issues under Japanese law, buyers currently cannot withdraw the NFT to their own crypto wallet such as MetaMask.
Setting the sale method
With a fixed price, you set the price in advance and sell at that price. With an auction, you set a minimum bid price and sell by auction.
Sale method
For fixed-price sales, you can choose between a first-come, first-served sale and a lottery sale. For a lottery sale, you can also limit the maximum number of reservations. If you do not set a maximum, a random lottery is held when the sale period ends; if you do set one, a random lottery is held immediately once that number of reservations is reached, even during the sale period.
Sale period
You can set a sale period of up to one month. The review may take some time. If the sale period starts before the review is complete, the sale will begin as soon as the review is complete.
Secondary royalty
If you set a secondary royalty, you can receive 10% of the resale price as a reward every time an NFT you issued is resold on the secondary market on HEXA.
Applying for free NFT distribution (airdrop) (ERC1155)
Check this box if you want to distribute NFTs free of charge. For details on the free NFT distribution (airdrop) feature, please see here.
NFT with membership
You can also issue an NFT as an NFT with membership. For membership NFTs, please see here.
4) Configure individual NFT settings
Configure the settings for each NFT you are selling.
Setting the price
Set the sale price (for auctions, the minimum bid price).
Setting the title and description
The title is required and must be 50 characters or fewer. The description is optional, but by describing in as much detail as possible, within 1,500 characters, the background and thinking behind the NFT, you can appeal not only through the data itself but also through the story behind it.
Setting holder-only messages and content
You can set messages or content that only people who have bought the NFT can see. Not only the original buyer but also anyone who buys it on the secondary market after it is resold can see the messages and content. You can check what you set as holder-only messages and content in the “We have received your NFT issuance request” email sent when you apply for issuance.
Airdrop issuance
With airdrop issuance, you can issue NFTs free of charge by using up tickets. The NFTs are issued after the review is complete and appear in your list of owned NFTs. NFTs issued by airdrop can only be given as gifts. People who receive them as gifts can resell them. Airdrop slots have previously been allocated from time to time to holders of the Residents NFT.
Private sale
You can sell an NFT without it appearing on list pages or collection pages until it is bought. Only people who know the URL of the sale page can buy it, so this is useful when you want to limit who you sell to. Once it is bought, it appears on list pages and collection pages.
Supplementary notes on rights
Please enter information such as the apps and tools used to create the content and any content cleared for commercial use that you have used. For AI-generated content, please enter here the AI used to generate it (note that HEXA's review cannot comprehensively check whether every piece of AI content is declared in the supplementary notes on rights, so HEXA does not guarantee these declarations).

5) Enter your email address, agree to the terms and apply for issuance
Finally, check what you are issuing, agree to the Terms of Use (Japanese), review the points to note when issuing, and then click the “Issue NFT” button to apply for issuance.

6) Verify your email address to complete the application (first time only)
Only the first time you apply to issue an NFT, you will receive an email address confirmation email with the subject “Notice of Provisional Registration | HEXA.” Click the link in this email to verify your email address, and your NFT issuance application will be complete. Please note that your NFT issuance application will not be reviewed until your email address has been verified.

Issuance by lazy minting
On HEXA, there is no fee for the issuance described above. This is because HEXA uses a method called lazy minting, in which the NFT is created on the blockchain only once it is actually sold. “Minting” means striking coins, and issuing an NFT is called “minting.” So when an NFT is bought for the first time, the HEXA fee is deducted from the sale price and the NFT is actually issued on the blockchain.
Setting up your NFT collection page
You can set up your creator page (collection page) from My Page → Issued NFTs.
1) User page header settings
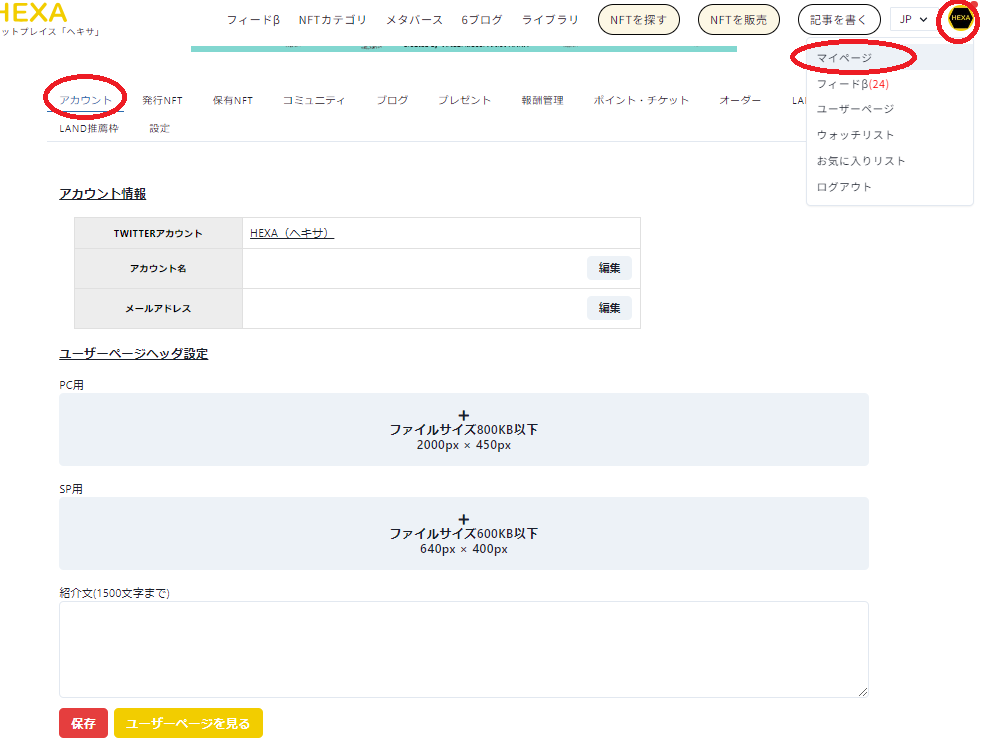
In the user page header settings under My Page → Account, you can set any banner image and introduction text you like for your user page. By describing the NFTs you issue, their story and background here, you can convey the appeal of all the NFTs you issue.
2) Collection settings
On HEXA, by setting collections for the NFTs you have issued, you can display them on the page divided into collections. Each collection page can also be shared with its own URL, so you can divide your collections by theme.

By clicking “Edit” in the collection field of My Page → Issued NFTs, you can assign NFTs to existing collections or add a new collection by setting a new collection name.

You can also enter not only a title but also a description for each collection, describing the collection and your thinking behind it. Writing a thorough description also has the benefit of making it easier to be found in Google and Yahoo searches.

3) Finalizing a collection and displaying statistics
Once you have finished issuing and setting all the NFTs in a collection, you can press the finalize button to finalize it. Once finalized, you can no longer do the following:
1) Delete the collection
2) Add or remove NFTs in the collection
In addition, the collection's display color changes from orange to light blue, and the following statistics are displayed:
1) Number of trades
2) Number of owners
3) Trading volume
4) Highest price
5) Floor price
6) On sale
7) Number issued
Please note that once a collection is finalized, it cannot be undone later.

Once you finalize a collection, no new NFTs can be issued in that collection. This limits the circulating supply of the existing collection, which may help increase the collection's value.
In addition, because this gives buyers a sense of the prices of the NFTs in the collection, more NFT investors may buy based on indicators such as the floor price and trading volume.
Showing related information on the NFT page
You can link a page that describes in detail the behind-the-scenes story of making the NFT, a detailed explanation, your feelings about it and so on in the “Related Information” field. Linked pages are limited to 6blog, and you can set the link from My Page → Issued NFTs → Related Information → Edit.


When you set related information, the 6blog article title and link can be shown on the NFT page as below. Why not create an introduction page for your NFT collection on 6blog and link to it from the NFT page to convey what the NFTs mean to you?

A link to the relevant NFT page is automatically added to the 6blog article set as related information. In addition, the blog article is also linked from the “Stories” tab under “Find NFTs” on the HEXA top page.
Through 6blog related information and project pages, you can reliably deliver your story to people who look for NFTs not only for the work itself but out of interest in stories such as how it was made and what went into it.

Setting NFT tags
You can set up to 5 tags per NFT. You can set them from My Page → Issued NFTs. Setting tags makes your NFTs more likely to appear in search engines such as Google and Yahoo, making them easier for people to find.

Tags you add are shown on the NFT page. Once tagged, tag links are displayed at the bottom of the NFT page as shown below. Cross-linking with search result pages in this way strengthens the link structure of the NFT page, making it more likely to appear in and be rated highly by search engines such as Google and Yahoo. It will also make your NFTs easier to discover when HEXA's tag features are enhanced in the future.

Launching a Web3-style community
NFT issuers can use, free of charge, a holder-only community feature that lets them make announcements exclusively to holders of the NFTs they issue and communicate with those holders.
This feature makes it possible to run Web3-style online salons and fan clubs and carry out a variety of other initiatives. Participants hold ownership of data in the form of NFTs, so you can easily build a relationship in which everyone works together to energize the community. Because no crypto or wallet is needed, members do not have to buy crypto or set up a wallet to join the community or buy NFTs, so you can run a Web3-style community in a way that is easy for many users to join. For further details, see here.
1) Launch a holder-only community
From the Community tab on My Page, you can create a community for each of the collections described above (or for all your NFTs).

Press the create button to set the title, description and banner image as shown below. This information is public to everyone, including people who do not hold the NFT, so we recommend describing the community in a way that is easy for outsiders to understand.

2) Create a topic
After creating a community, you can use the create topic button to create topics with content you want to share only with NFT holders.

When creating a topic, you can use a checkbox to choose whether to accept comments from NFT holders. If you only want to share information without accepting comments, uncheck “Allow comments” (only the issuer can then comment). You can also upload images.

Once you post a topic, NFT holders can view it as shown below. Topics and comments can also be given a heart with the “♡” button to let the issuer or commenter know you have read them.

3) Hold a vote
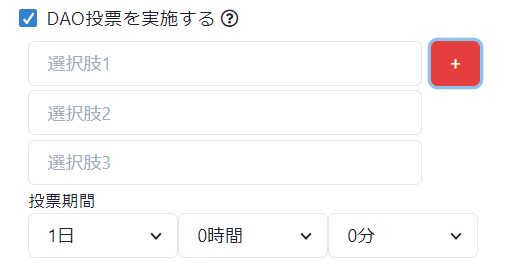
You can also hold votes within the community. The issuer presents the options, and holders can vote according to the number of NFTs they hold. Holding a vote lets you gauge the wishes of NFT holders weighted by their holdings, which you can use as a reference for decisions on running the community.
4) Collect survey responses and other submissions with forms
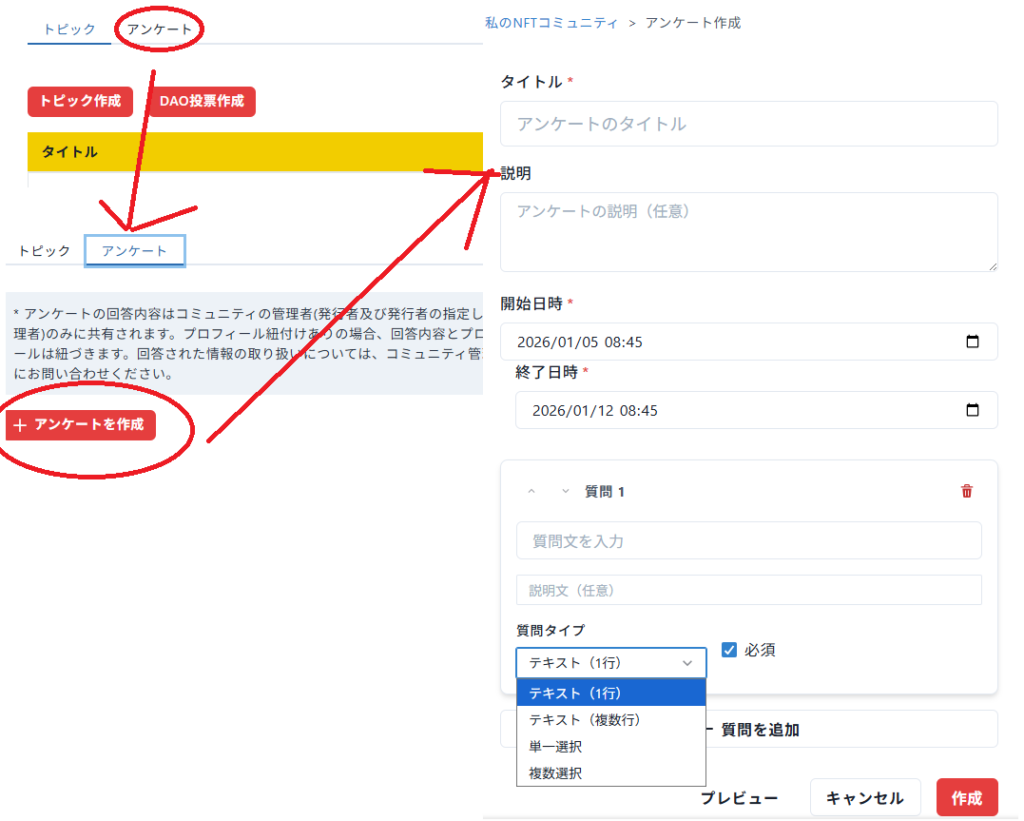
You can create forms to collect survey responses or applications from users in your community. This also lets you run campaigns for community users, such as gifts sent by mail.
5) Link multiple collections to one community
You can link multiple specific collections to a single community. To do so, select “Add this collection to an existing community” from the create community button.

Promoting NFTs with HEXA LAND ad-space NFTs
HEXA LAND NFTs are ad-space NFTs: ads are shown on almost every page of nft.hexanft.com according to each LAND's ad ratio. You can set this up from My Page → LAND Ad Space. If no ad has been set, the holder name and a link to the holder's LAND page are shown. HEXA LAND NFTs, which are ad-space NFTs, can be purchased here.
Just upload banners for PC and smartphone, set any link you like and submit your application. The review takes about 3 business days, after which your ad starts being shown.

Displaying and selling in a HEXA Metaverse room
If you hold HEXA's 1st Residents NFT (blue), you can display NFTs that you are about to put on primary sale, or that are on sale, in the HEXA Metaverse space. For details on the Residents NFT, see here; to buy a Residents NFT, go here.
1) Use the Creators' Shop feature
Once you have bought a Residents NFT, you can set up your display by opening “Edit” for your blue Residents room from the HEXA Metaverse page and selecting “Creators' Shop” from the settings icon at the top right.

2) Lock your room (NFT keys are also possible)
If you hold at least one HEXA LAND NFT, you can lock your HEXA Residents room space. There are two types of lock: one that uses a passphrase and one that uses an NFT. Locking with an NFT also lets you sell things such as room entry ticket NFTs.
Displaying NFTs in their primary sale is possible only with the 1st Residents NFT (blue Residents NFT), but NFTs you have bought and own can be displayed with any Residents NFT. For details, please see the table below and this page.

Creating a creator land on HEXA LAND
HEXA LAND NFTs are also metaverse plot NFTs, giving you a plot in the HEXA Metaverse space according to each LAND. HEXA LAND NFTs can be purchased here.
Unlike Residents metaverse rooms, on HEXA LAND you can also place all of the NFTs you have issued that have been sold. This makes it possible to create a creator land that exhibits all of your works, including past ones. Sold NFTs you issued are shown with their owner's name, which can also help increase the value of NFTs already sold. You can also add external links to NFTs and place entrances to Residents rooms and the like.
However, so that the metaverse can be used seamlessly on many devices, each area has limits on the total size, number of polygons, number of objects and so on of the NFTs that can be placed. For details on HEXA Metaverse, see here.

Avatar NFTs and area NFTs for HEXA Metaverse
In HEXA Metaverse, you can also sell “area NFTs,” 3D NFTs that can be set on HEXA LAND plots, and “avatar NFTs,” 3D NFTs that can be used in HEXA Metaverse. You can find the detailed specifications for avatar NFTs here and details on using area NFTs here.

Generating a page for in-person exhibitions
There is a feature that displays HEXA works optimized for exhibition displays. Please understand that we do not guarantee that it will display properly on every device.
Also, if you hold an exhibition yourself, using this feature does not exempt you from obtaining permission to display the works, so please check this yourself and obtain consent before holding the exhibition (you do not need HEXA's approval to use this feature).
Sample link and specifications
https://nft.hexanft.com/nft/exhibition?code=30952_27366_19664_jRMV8E0Y&interval=90
How to specify works
You can specify a work by entering after code= the NFT's ID (for the Ethereum chain, an ID such as nft-1) or, for a sale page that has not yet been bought, the sale page's code (jRMV8E0Y in the example above).
By entering a number of seconds after interval=, you can have the display switch at that interval. In the example above, 90 seconds is set.
How switching works
So that many displays lined up side by side do not get out of sync, they all switch at the same time based on each device's clock. If the switching timing is off, updating the device's clock to the correct time will fix it.
Other tips
3D data is slow to display or has a large file size
Having reviewed the 3D data sold on HEXA in the past, we found that if your 3D data has a large file size or is slow to display, you can reduce the file size and speed up display with the following steps.
Some of you have already carried out the optimizations below, but in many cases they do reduce the size, so please use them for reference.
1) Merge objects
2) Compress texture data (including reusing the same texture across multiple objects)
3) Compress GLB files: e.g., the glTF Draco compression algorithm
4) Optimize animations: remove unnecessary keyframes and optimize animation loops
5) Remove unnecessary data: delete unused textures and materials, and delete unused nodes
If your 3D objects are slow to display or have large file sizes, please check the above.